25. July 2017
ORCID: Static Publication Site-Tutorial
Transfer and Service
Probably every research group in the world faces the problem of collecting all publications of all group members. Usually, the list publications is displayed in structured way on the group’s homepage to provide an overview of the research topics and impact of the group. The larger and older the group, the more publications are in this list and the more painful is the manual collection of the publication list. Additional features such as searching for authors, keywords, and titles, linking additional author data to the publication (such as membership periode in the group), and handling name changes turn a simple publication list in a interesting use case for Big Data. An effective solution to this problem is given in this tutorial on using ORCID in Python. The tutorial is written for python starters and gives an introduction in many techniques:
- Advanced features of python 3.6
- Interacting with SQLite in python
- Interacting with a REST-API in python.
- Interacting with the ORCID public API
- Reading and writing bibtex files in python
- Creating HTML of a bibtex file in python
- Filtering HTML content with javascript
Understanding basic python syntax is required for this tutorial.
Introduction
In many institutations, the publication list is handled manually either by the administrator or by every member of the group. The result is that the sites are outdated. For different reasons, publications can get lost on the way. Also, the publications are usally stored in a database, which is potentially open for attacks. Since these systems are often handmade solutions, even the possibility of filtering data is limited. Thus, finding a relevant publication might be diffcult even if the list is up-to-date. Therefore, we need a system with following features:
- It updates itself
- It needs no administration
- It is a static site with no DB in the background
- It is interactive and allows filtering of the data.
Good for us, there is a project called ORCID. You can check out the project’s website here. Their vision is:
“ORCID’s vision is a world where all who participate in research, scholarship, and innovation are uniquely identified and connected to their contributions across disciplines, borders, and time.”
ORCID
This matches perfectly with our aim to collect all data of a group of researchers. Now, the task is clear:
- Collect the ORCIDs of your resaracher.
- Collect all publications for the IDs.
Fortunately, ORCID has a free public API. Thus, data can be collected automatically. ORCID runs a sandbox instance with this API, which comes handy into play for our tutorial. In this tutorial, we use three fictional ORCIDs in the Sandbox:
- Norbert E. Horn (0000-0002-1909-4153)
- ScaDS_test (0000-0002-0183-570X)
- ScaDS_test2 (0000-0003-0397-7442)
The complete project is written following the object-oriented prgramming paradigm , i.e. is encapsulated into classes. In Python all of these classes can be put in one file or can be spread in different packages. In the tutorial, all classes are put into one file. The tutorial is written to work with python 3.6. An overview of the data flow in the tutorial looks as follows:

The data is hold into four different forms (horizontal lines) and six different states (vertical lines). The data flow is shown by the arrows. In the bottom, the corresponding Sections of the tutorial are shown.
SQLite in Python
The first step is to collect the ORCIDs of you researcher. We must only save the informational content. The “-” are the same for every ORCID, so no information can be hidden. In our case we have three of them:
- 0000000219094153
- 000000020183570X
- 0000000303977442
These three must be saved somewhere. It is the only part where the program interacts with a DB and it is done only in the backend. Thus there is no possibility to interact with this DB from outside. We use a really simple SQLite DB with one table “people” that has three fields:
- orcid CHARACTER(16)
- start DATE
- end DATE
The first field is the ORCID of you researcher. The other two represent the period of time the researcher belongs to your institute. People chang groups. Therefore, a publication that is written before or after their attendance in your institute should not be listed in your publication list. In our case, SQLite DB is a good idea due to the simplicity of the DB. Also, the queries on the DB are not time critical. To interact with SQLite, python has a standard library: sqlite3. This library fulfills the python DB-API 2.0 standard. As a result, it can be replaced with any other SQL DB interface.
First, a Connection to the DB is created. Afterwards, a Cursor is retrieved from this connection. The cursor can execute SQL commands. After all commands are executed, the Connection is used to save the data with a commit. At the end, the Connection is closed with the close command. The following simple python script to fills the DB:
import sqlite3

conn = sqlite3.connect('people.db')
c = conn.cursor()

c.execute("CREATE TABLE people (orcid CHARACTER(16), start DATE, end DATE)")
c.execute("INSERT INTO people VALUES ('0000000219094153','1900-01-01','2016-12-31')")
c.execute("INSERT INTO people VALUES ('000000020183570X','1900-01-01','2016-12-31')")
c.execute("INSERT INTO people VALUES ('0000000303977442','1900-01-01','2016-12-31')")

conn.commit()
conn.close()
Line 3 and 4 create the connection and the cursor. The file in which the SQLite DB is saved is named “people.db”. In Line 6 the table is created as described above. In line 7-9 the values of the three ORCIDs are inserted. The researchers stayed at our fictional institute from January 1st 1900 to December 31 2016. The script is run once. After that, the data is saved in the people.db and can be read.
Now, a new script is written that contains all classes of this script and the main function. This script is titled __main__.py. This name is used in python to express that a main function of the package is contained in the file. The command “python .” can be used to start the script.
The first class represents a DB object that interacts with the SQLite DB. It has a initialization function, a function to get the data as list and a function to close the connection:
class DB:
	def __init__(self,path="people.db"):
		self.conn = connect(path)
		self.c = self.conn.cursor()
	def getList(self):
		self.c.execute('SELECT * FROM people')
		return self.c.fetchall()
	def close(self):
		self.conn.close()
In line 2 the initialization is startet with the __init__ keyword. Initialization has an optional parameter that contains the path to the DB file. The getList function in Line 6 uses SQL syntax to select all fields and entries from the people. DB-API 2.0 function fetchall fetches all entries and returns them as a list of tuples. These tuples contain all three fields as strings. The last function closes the Connection to the DB. We create a simple main function that uses the DB class:
if __name__ == "__main__":
	db = DB()
	print(db.getList())
	db.close()
It should produce an output like this:
[('0000000219094153', '1900-01-01', '2016-12-31'), ('000000020183570X', '1900-01-01', '2016-12-31'), ('0000000303977442', '1900-01-01', '2016-12-31')]The complete result of this section can be downloaded here:
Date, OrcID and WorkSummary Class (Filter 1)
{source}<?php $document = JFactory::getDocument(); $document->addStyleSheet(“/templates/gantry_with_script/css/prism.css”);$document->addScript(“/templates/gantry_with_script/js/prism.js”); ?>{/source}
{source}<style>
code, pre {font-size:13px}
</style>{/source}
Now, we will define our data model. It consists of three classes: Date, OrcID, and WorkSummary. Data retrieved from ORCID using the ORCID-API will be parsed into objects of these types. The classes implement methods for comparsion, which will be used to filter the data.
Date
The first class is the Date. It represents a date and is either a publcation date or start or stop date of a user’s membership at the institute. The Date class only needs a year to be valid. Undefined parts are ‘None‘ and are considered as equal to everything. A ≤ function is implemented that represents this fact.
class Date:
	def __init__(self, y, m, d):
		self.y = int(y)
		self.m = int(m) if m else None
		self.d = int(d) if d else None
	def check (self, other, attr):
		if getattr(self,attr) == None or getattr(other,attr) == None:
			return 1
		if getattr(self,attr) < getattr(other,attr):
			return 1
		if getattr(self,attr) > getattr(other,attr):
			return -1
		return 0
	__le__ = lambda self, other: True if 1 == (self.check(other,"y") or self.check(other,"m") or self.check(other,"d") or 1) else False
	__str__ = lambda self: str(self.y) + "-" + str(self.m) + "-" + str(self.d)
In lines 2-5, the initialization of the Date class where the year, month, and the day can be a number, a string that represents the number or in case of month and day None. To make a number out of the string the built-in function int() is used. In Line 4 and 5 a conditional expression is used to check if the month (day) is None. Python interprets different values as False. The defintion is:
In the context of Boolean operations, and also when expressions are used by control flow statements, the following values are interpreted as false: False, None, numeric zero of all types, and empty strings and containers (including strings, tuples, lists, dictionaries, sets and frozensets). All other values are interpreted as true.
Here, None is interpreted as False and goes in the part after the else. Thus, None is saved for this variable. This is necessary, because “int(None)” results in an error.
In lines 6-13 you see a helper function that checks for another date and a given attribute (“y“,”m“, or “d“), if one of them is smaller at this attribute. To get access to these attributes, an other build-in function is used: the getattr() function. Line 7 checks, if the attribute is None in one of the dates. If this is the case, 1 is returned to show that self is smaller or equal to other. In the case where self is smaller than other (line 9), 1 is returned. If self is larger than other for this attribute (line 11), a -1 is returned. When either is not the case, the attribute needs to be equal. Then, 0 is returned.
In line 14, the ≤ function is defined. In a python object, this is done by overwriting the __le__ function. The function is written as a lambda function. Arguments are defined as self and other. Again, there is a conditional expression that returns True, if a chain of checks returns 1 – and False otherwise. This chain is linked with “or” and works because of the special definiton of or:
“The expression x or y first evaluates x; if x is True, its value is returned; otherwise, y is evaluated and the resulting value is returned.”
First, the years (y) are compared. If they are equal, a 0 is returned. This is interpreted as False and the next check is evaluated. Otherwise, if the self.y is smaller than other.y, a 1 is returned from the check and the evaluation stops. The result is 1 and True is returned. If self.y is larger than other.y, the check returns a -1. This also stops the evaluation, but is unequal to 1. So, False is returned. Thus, all three parts from year to day are checked. If all are equal, all are interpreted as False If so, the fourth case of the chain, where simply a 1 is returned, is evaluated. So that in this case the function also returns True.
In the last line, the standard string representation of the Date class is overwritten. This is a keyword function(__str__). Again, a lambda function is used that simply concatenates the strings of the three parts with a “-” between them.
OrcID
The second class is the OrcID class. This class represents an ORCID as stored in the SQLight DB. So, it gets an id, a start and a stop date for initialization. We define two helper functions. First, a getID function, that formats the ORCID with a “-” every 4 symbols. Secondly, a function to get a string representation of the OrcID object.
class OrcID:
	def __init__(self, id, start, stop):
		self.id = id
		self.start = Date(*start.split("-"))
		self.stop = Date(*stop.split("-"))
	getID = lambda self: "-".join([self.id[4 * i : 4 * (i + 1)] for i in range(4)])
	__str__ = lambda self: self.getID() + ": " + str(self.start) + " - " + str(self.stop)
The initialization in lines 2-5 saves the id, converts the start and stop dates into Date objects, and stores them. These conversations in lines 4-5 expect that the input string is in the format “YYYY-MM-DD”. This is the format how SQLite returns the dates. First, the String function split is used to make a list out of this [y,m,d]. The list then is unpacked in single arguments with the “*” operator.
In line 6, the getID function is defined as lambda function. The goal to place a “-“ every 4 symbols is reached by first creating a list of these 4 symbol blocks. For this, i iterate over the range(4) i.e. [0,1,2,3]. and create the block from 4*i to 4*(i+1). Afterwards, these blocks are joined in one string with “-“ as separator with the str.join function. The last line is a simple string representation of the OrcID object in the form ‘id:start-end‘. To test these two classes, we change the main function as follows:
if __name__ == "__main__":
	db = DB()
	orcs = [OrcID(*t) for t in db.getList()]
	db.close()
	for orc in orcs:
		print("Do something with",orc)
In line 3, a list comprehension is used to create a list of OrcIDs out of the list of tuples that db.getList() returns. Again, unpacking is used to resolve the tuples that are saved in t to the parameters that OrcID gets. The output looks like this:
Do something with 0000-0002-1909-4153: 1900-1-1 - 2016-12-31
Do something with 0000-0002-0183-570X: 1900-1-1 - 2016-12-31
Do something with 0000-0003-0397-7442: 1900-1-1 - 2016-12-31
WorkSummary
The last class is the WorkSummary class. This class represents a summary of a work, i.e. publication. A WorkSummary has three fields: a path, where more information can be found, a title and a publication date. These classes should be compared later in the filter step. Thus, a smaller and an equal function are implemented.
class WorkSummary:
	def __init__(self, path, title, date):
		self.path = path
		self.title = title
		self.date = date
	__lt__ = lambda self, other: self.date.y < other.date.y or (self.date.y == other.date.y and self.title < other.title)
	__eq__ = lambda self, other: self.date.y == other.date.y and self.title == other.title
	__str__ = lambda self: self.title + ": " + str(self.date)
The initialization in lines 2-5 is straight forward. Our comparisons in lines 6-7 will compare the year of the publication and the title. The rest of the Date is not used to make the comparison not over specific. Both comparisons are written in lambda form. In line 6, the smaller function uses the keyword __lt__ and checks if the year is smaller or if the year is equal and if the title is smaller. For the equal comparison, the keyword __eq__ is used. The WorkSummaries are equal when the year and the title are equal. In the last line, you can see a simple string representation of the WorkSummary object in the form “title: data“. The result of this section can be downloaded here.
Rest-API
Now we have everything ready to interact with the public ORCID-API. To do this, we use a third party library: the Requests: HTTP for Humans library. The requests library says about it self: “Requests is the only Non-GMO HTTP library for Python, safe for human consumption.” Using this library is very simple. However, we need to install it. In pip, you have to run:
pip install requestsIf this doesn’t work, have a look at the installation introductions of requests. With requests installed, we can look in the public API of ORCID. As a reminder, we want to read public data from the sandbox instance of ORCID. We use the 2.0 version of the API and get all answers in json format.
The interaction with the API needs to be authorized. This authorization uses a client_id and client_secret that you create from your account for an app. Here, we can simple use existing data from Norbert E. Horn. Since it is in the sandbox. the data is not important to be secret. With this data, we receive a read-public access token. This is the first API interaction with a specific endpoint. The answer contains a token. This token is used for all interactions with the API and is send with every request.
Beside this initial interaction to get the token, we have two more interactions with the API to get all WorkSummarys of a specific OrcID and get the complete work for a WorkSummary. However, we start with the initialization of the class where we get the token:
from requests import Session
class API:
	auth = "https://sandbox.orcid.org/oauth/token"
	ORC_client_id = "APP-DZ4II2NELOUB89VC"
	ORC_client_secret = "c0a5796e-4ed3-494b-987e-827755174718"
	def __init__(self):
		self.s = Session()
		self.s.headers = {'Accept': 'application/json'}
		data = {"grant_type":"client_credentials", "scope":"/read-public","client_id":self.ORC_client_id, "client_secret":self.ORC_client_secret}
		r = self.s.request(method ="post",url= self.auth, data=data)
		self.s.headers = {'Accept': 'application/json',  "Access token":r.json()["access_token"]}
In the first line the Session class is loaded from the requests library. This is the Session that interacts with the API. In linse 3-5, the class variables are saved that are used to get the token: first, the url which provides the token for the ORCID-Sandbox, then the data of Norber E. Horn.
The initialization starts in line 6. In line 7, a new Session object is created and saved in self. In line 8, the headers property of this Session is set. It is a dict with data that is sends as header in all requests that are made with this session. Now, we save the information that we want in json format. In line 9, a dict is saved that contains the data that is send with the request. Four properties are saved:
- The “grant_type” which is set to “client_credentials” because we use client credentials to get the token.
- The “scope” which is set to “\read-public” because we want a token to read public data.
- The “client_id” to authenticate the access.
- The “client_secret” to verify the authentication.
Line 10 sends the request. This is done by the Session object with the request function. This function is given three arguments:
- The method which is the HTTP method we make a “post”.
- The url which is the auth address.
- The data as the prepared data dict.
The result is a Response object. The function json() will parse the response and create a dict of the result. In the dict, the key “access_token” stores the token. In line 11, it is parsed and saved as a new header for the Session.
The next class function is the getWorks function that gets all WorkSummarys of a given ID. For it, we need the endpoint of the ORCID-API to return this this information. An overview of all endpoints is given in the basic tutorial as a table. The endpoint, that we are looking for, is “/works”. It gives a summary of research works. To complete the URL, we need the resource URL for the v2.0 public API: “https://pub.sandbox.orcid.org/v2.0“. The complete URL is:
https://pub.sandbox.orcid.org/v2.0/[ORCID iD]/worksAn overview on the response from the API is described on github. However, this is not trivial to understand. To get the idea, it’s recommended to look in one (shortened) response example:
{
	'last-modified-date': {'value': 1497863814424},
	'group': [
		{
			'last-modified-date': { 'value': 1497791040610},
			'external-ids': {
				'external-id': []
			},
			'work-summary': [
				{
					'put-code': 837564,
					'created-date': {'value': 1497791040610},
					'last-modified-date': {'value': 1497791040610},
					'source': {
						'source-orcid': {
							'uri': 'http://sandbox.orcid.org/0000-0002-1909-4153',
							'path': '0000-0002-1909-4153',
							'host': 'sandbox.orcid.org'
						},
						'source-client-id': None,
						'source-name': {'value': 'Norbert E. Horn'}
					},
					'title': {
						'title': {'value': 'Finding the data unicorn: A hierarchy of hybridity in data and computational journalism'},
						'subtitle': None,
						'translated-title': None
					},
					'external-ids': {
						'external-id': []
					},
					'type': 'JOURNAL_ARTICLE',
					'publication-date': {
						'year': {'value': '2017'},
						'month': None,
						'day': None,
						'media-type': None
					},
					'visibility': 'PUBLIC',
					'path': '/0000-0002-1909-4153/work/837564',
					'display-index': '1'
				}
			]
		},
		...
	],
	'path': '/0000-0002-1909-4153/works'
}
The response is a json object with three members: last-modified-date, group, and path. Only the group member is interesting now, because it is a list of work-summaries. In the list, for every work of the researcher, a json object with three members is stored. For us, only work-summary member is interesting. It is a list with containing only the work-summary object.
This work-summary object has many members. For us, three of them are interesting: the title, the publication-date and the path. The last one contains the API path to the complete record of this work. The title is an object where the title as string can be found in title.value. Our publication-date is an object with separate members for year, month, and day. They can be None or store the respectic date value in value.
Now, we need a python function that parse these information:
baseurl = "https://pub.sandbox.orcid.org/v2.0"
getDate = lambda self,d: Date(d["year"]["value"],d["month"]["value"] if d["month"] else None, d["day"]["value"] if d["day"] else None )
def getWorks(self,id):
	r = self.s.request(method= "get",url = "{0}/{1}/works".format( self.baseurl, id.getID()))
	for work in (w["work-summary"][0] for w in r.json()["group"]):
		yield WorkSummary(work["path"],work["title"]["title"]["value"],self.getDate(work["publication-date"]))
In line 1, the baseurl is saved as class variable, so that it can be used later. In line 2, a helper function is defined that transforms a publication-date object from the API into a Date object. The function is a lambda function and gets self and the date in dict format as d as input. The transformation is not trivia,l since the day should be None if [“day”] is None and otherwise it is the value of [“day”][“value”]. The last one creates an error if [“day”] is None. To solve this, a conditional expression is used to check if [“day”] is not None. If so the value of [“day”][“value”] is used. The same must be done for the month.
The getWorks function get as argument an id which should be an OrcID object. For these id, all summaries are loaded and all WorkSummary objects are returned. However, a look in the function shows that it is not a normal function with a return keyword. Instead the yield keyword is used. Therefore, it is a generator function that returns a iterator. Such iterators can be used in a for loop and in every iteration of the next() function. Execution of the generator works like every function until a yield is reached. The return value behind yield is the result of the first next(). The status of the function is saved.
Every time the next() function on the iterator is called, the function continues, where the last yield was called until the next yield is reached. This means, that after one value is processed, it is discarded from memory. When no further yield is reached, the iteration stops.
In line 4, the request is sent. The “get” method is used like the API expected it. The url is created with string formating. In line 5, the iteration over the work starts. This is done with a special case of list comprehension. The works are given a list in the “group” member. We want to iterate over all elements in this list. The objects are saved in w. For these objects, the work summary is found in the first element of the member “work-summary”. So, we only want to iterate over this. A list comprehension:
[w["work-summary"][0] for w in r.json()["group"]]creates a list with exactly the objects that we iterate. However, in the getWorks function the outer “[]” are replaced with “()”. This means, that we don’t create a list, but we create an iterator with generator expression. Thus, every element is created when it is needed and discarded afterwards. This is more memory friendly than creating the complete list. In line 6, for every work, a WorkSummary object is created and yielded. The path and title are obtained using a simple routing to the strings in the json. For the date, the getDate function is used.
Using this function, we can create a list of all works and filter them. However, after filtering the complete data of the work should be parsed. So, we need a second function in the API that get the complete work for a WorkSummary. The endpoint of this is “/work/[id]”. These endpoints are saved with the id in the WorkSummarys as path. Here is an example for a response of this endpoint:
{
	'created-date': {'value': 1497791040610},
	'last-modified-date': {'value': 1497791040610},
	'source': {
		'source-orcid': {
			'uri': 'http://sandbox.orcid.org/0000-0002-1909-4153',
			'path': '0000-0002-1909-4153',
			'host': 'sandbox.orcid.org'
		},
		'source-client-id': None,
		'source-name': {'value': 'Norbert E. Horn'}
	},
	'put-code': 837564,
	'path': '/0000-0002-1909-4153/work/837564',
	'title': {
		'title': {'value': 'Finding the data unicorn: A hierarchy of hybridity in data and computational journalism'},
		'subtitle': None,
		'translated-title': None
	},
	'journal-title': {'value': 'Digital Journalism'},
	'short-description': None,
	'citation': {
		'citation-type': 'BIBTEX',
		'citation-value': '@article{hermida2017finding, title= {Finding the data unicorn: A hierarchy of hybridity in data and computational journalism}, author= {Hermida, Alfred and Young, Mary Lynn}, journal= {Digital Journalism}, volume= {5}, number= {2}, pages= {159--176}, year= {2017}, publisher= {Routledge}}\n\n'
	},
	'type': 'JOURNAL_ARTICLE',
	'publication-date': {
		'year': {'value': '2017'},
		'month': None,
		'day': None,
		'media-type': None
	},
	'external-ids': {'external-id': None},
	'url': None,
	'contributors': {'contributor': []},
	'language-code': None,
	'country': None,
	'visibility': 'PUBLIC'
}
The response is one object with many members. Parts are already known from the summary, others are new but also uninteresting for us. In fact, the only way to get the complete record is to read the citation. The other members do not contain all information. Here, we are interested in this and simply want a function that returns the citation-value:
def getWork(self, summary):
	r = self.s.request(method= "get",url= self.baseurl + summary.path)
	return r.json()['citation']['citation-value']
The function is defined straight forward. It gets a summary which is a WorkSummary object as input. First, the request is made (line 2). It is again a “get” and the url is the combination of the baseurl and the path of the summary. From the response, the citation-value is obtained and returned:
from requests import Session
class API:
	auth = "https://sandbox.orcid.org/oauth/token"
	ORC_client_id = "APP-DZ4II2NELOUB89VC"
	ORC_client_secret = "c0a5796e-4ed3-494b-987e-827755174718"
	def __init__(self):
		self.s = Session()
		self.s.headers = {'Accept': 'application/json'}
		data = {"grant_type":"client_credentials", "scope":"/read-public","client_id":self.ORC_client_id, "client_secret":self.ORC_client_secret}
		r = self.s.request(method ="post",url= self.auth, data=data)
		self.s.headers = {'Accept': 'application/json', "Access token":r.json()["access_token"]}
	baseurl = "https://pub.sandbox.orcid.org/v2.0"
	getDate = lambda self,d: Date(d["year"]["value"],d["month"]["value"] if d["month"] else None, d["day"]["value"] if d["day"] else None )
	def getWorks(self,id):
		r = self.s.request(method= "get",url = "{0}/{1}/works".format( self.baseurl, id.getID()))
		for work in (w["work-summary"][0] for w in r.json()["group"]):
			yield WorkSummary(work["path"],work["title"]["title"]["value"],self.getDate(work["publication-date"]))
	def getWork(self, summary):
		r = self.s.request(method= "get",url= self.baseurl + summary.path)
		return r.json()['citation']['citation-value']
With this, we can write a new main class that gets all the WorkSummarys and print them:
if __name__ == "__main__":
	db = DB()
	orcs = [OrcID(*t) for t in db.getList()]
	db.close()
	alldocs = []
	api = API()
	for orc in orcs:
		alldocs += api.getWorks(orc)
	for d in alldocs:
		print (d)
Line 9 calls the getWorks and the resulting list is added with a “+=” to the alldocs list:
Finding the data unicorn: A hierarchy of hybridity in data and computational journalism: 2017-None-None
The generalized unicorn problem in Finsler geometry: 2015-None-None
Unicorn: A system for searching the social graph: 2013-None-None
The unicorn, the normal curve, and other improbable creatures.: 1989-None-None
Combined Measurement of the Higgs Boson Mass in p p Collisions at s= 7 and 8 TeV with the ATLAS and CMS Experiments: 2015-None-None
It's a small world: 1998-None-None
Combined Measurement of the Higgs Boson Mass in p p Collisions at s= 7 and 8 TeV with the ATLAS and CMS Experiments: 2015-None-None
11 The Death of the Author: 1994-None-None
Kritik der reinen Vernunft: 1889-None-None
The complete result of this section can be downloaded here.
Sorting and Filter (2)
Now, we want to get rid of works that are not in the period a person worked for us. We also want to remove duplicates. For this, we use the comparison functions that are implemented in the classes and some standard python libraries. First, we get rid of the works that don’t overlap with the dates of the OrcID objects, i.e. the works that don’t belong to our group. This is done by altering the line where the getWorks are added to alldoc:
alldocs += [d for d in api.getWorks(orc) if orc.start <= d.date <= orc.stop]Again, we do a list comprehension, but with an if statement. This means, that in the new list only these elements are contained for which the if condition is True. The statement checks if the date of the work (d) is between the start and end date of the OrcID. Note the chained form of them checks with two <= statements. In fact, this is more effective than separate statements:
“Comparisons can be chained arbitrarily, e.g., x < y <= z is equivalent to x < y and y <= z, except that y is evaluated only once (but in both cases z is not evaluated at all when x < y is found to be false).”
Now, we have a list (alldocs) containing all works by the group. The next step is to sort them. For this, the WorkSummary class has the smaller and equal operation, so that we can do a simple sort() call:
alldocs.sort()Lastly, we are reducing the duplicates. This can be done by using the standard library itertools and the groupby function. This function needs a sorted list as input, so that equal objects are grouped together. The function reduces these groups to a tuple of a key and a list of the objects. Here, the key is the first of these objects, so that we can simply iterate over the function result keeping only the keys:
import itertools
uniqdocs = [doc for doc,_ in itertools.groupby(alldocs)]
We create a new list that contains only the key of the groupby call. The first element (key) is saved in doc and the second is marked with the “_” symbol to be thrown away:
import itertools
if __name__ == "__main__":
	db = DB()
	orcs = [OrcID(*t) for t in db.getList()]
	db.close()
	alldocs = []
	api = API()
	for orc in orcs:
		alldocs += [d for d in api.getWorks(orc) if orc.start <= d.date <= orc.stop]
	alldocs.sort()
	uniqdocs = [doc for doc,_ in itertools.groupby(alldocs)]
	for d in uniqdocs:
		print (d)
This results in:
The unicorn, the normal curve, and other improbable creatures.: 1989-None-None
11 The Death of the Author: 1994-None-None
It's a small world: 1998-None-None
Unicorn: A system for searching the social graph: 2013-None-None
Combined Measurement of the Higgs Boson Mass in p p Collisions at s= 7 and 8 TeV with the ATLAS and CMS Experiments: 2015-None-None
The generalized unicorn problem in Finsler geometry: 2015-None-None
The list is now sorted and duplicates are removed. The complete result of this section can be downloaded here.
BibTeX in Python
BibTeX is a format to hold a list of references. We need it, because the information is saved in ORCID as a BibTeX formatted string. We need to parse this string and convert it to a useful representation. There already is a parser for bibtex: the python base program Pybtex. It comes with a Python-API we can use. First, we need to install Pybtex on the system with pip:
pip install pybtexIf this doesn’t work, have a look in the Git-Reposity for installation instructions. An overview of the python libary can be found in the Documentation of Pybtex. To read the bibliography from a string, a simple function exists:
pybtex.database.parse_string(value, bib_format, **kwargs)The return value is a BibliographyData object. The plan is to parse every work and combine these objects to one BibliographyData object. This can be achieved by creating an empty BibliographyData object and adding the entries of all parsed BibliographyData to it. To get access to the entries, the class variable entries is used. It holds a dict of all entries. A simple helper function is written for it. The resulting BibliographyData object can be written to a BibTeX file by using the to_file function of the BibliographyData object. A solution to view the content of such a BibliographyData object is to write it in a file:
from pybtex.database import BibliographyData, parse_string
def joinBibliography(bib1, bib2):
	for key in bib2.entries:
		bib1.entries[key] = bib2.entries[key]

if __name__ == "__main__":
	db = DB()
	orcs = [OrcID(*t) for t in db.getList()]
	db.close()
	alldocs = []
	api = API()
	for orc in orcs:
		alldocs += [d for d in api.getWorks(orc) if orc.start <= d.date <= orc.stop]
	alldocs.sort()
	uniqdocs = [doc for doc,_ in itertools.groupby(alldocs)]
	bib = BibliographyData()
	for d in uniqdocs:
		joinBibliography (bib,parse_string(api.getWork(d),"bibtex"))
	bib.to_file(open("out.bib","w"))
Line 1 loads the BibliographyData class and the parsing function from pybtex. The helper function (lines 2-4) adds all entries from bib2 to the entries from bib1. Until line 16, it’s the normal main function. Then, the new empty BibliographyData object (bib) is created that is used to collect all data. In line 18, the API function getWork is used to get the BibTex format of the entry. The result format “bibtex” is given as argument for the parsing function. The result is added to bib with the helper function. In the last line, the result is written to a file named “out.bib”. The content of out.bib should look like this and it can be downloaded here:
@article{micceri1989unicorn,
    author = "Micceri, Theodore",
    title = "The unicorn, the normal curve, and other improbable creatures.",
    journal = "Psychological bulletin",
    volume = "105",
    number = "1",
    pages = "156",
    year = "1989",
    publisher = "American Psychological Association"
}

@article{barthes199411,
    author = "Barthes, Roland",
    title = "11 The Death of the Author",
    journal = "Media Texts, Authors and Readers: A Reader",
    pages = "166",
    year = "1994",
    publisher = "Multilingual Matters"
}

@article{collins1998s,
    author = "Collins, James J and Chow, Carson C",
    title = "It's a small world",
    journal = "Nature",
    volume = "393",
    number = "6684",
    pages = "409--410",
    year = "1998",
    publisher = "Nature Publishing Group"
}

@article{curtiss2013unicorn,
    author = "Curtiss, Michael and Becker, Iain and Bosman, Tudor and Doroshenko, Sergey and Grijincu, Lucian and Jackson, Tom and Kunnatur, Sandhya and Lassen, Soren and Pronin, Philip and Sankar, Sriram and others",
    title = "Unicorn: A system for searching the social graph",
    journal = "Proceedings of the VLDB Endowment",
    volume = "6",
    number = "11",
    pages = "1150--1161",
    year = "2013",
    publisher = "VLDB Endowment",
    doi = "10.14778/2536222.2536239"
}

@article{aad2015combined,
    author = "Aad, Georges and Abbott, B and Abdallah, J and Abdinov, O and Aben, R and Abolins, M and AbouZeid, OS and Abramowicz, H and Abreu, H and Abreu, R and others",
    title = "Combined Measurement of the Higgs Boson Mass in p p Collisions at s= 7 and 8 TeV with the ATLAS and CMS Experiments",
    journal = "Physical review letters",
    volume = "114",
    number = "19",
    pages = "191803",
    year = "2015",
    publisher = "APS"
}

@article{cheng2015generalized,
    author = "Cheng, Xinyue and Zou, Yangyang",
    title = "The generalized unicorn problem in Finsler geometry",
    journal = "Differential Geometry-Dynamical Systems",
    volume = "17",
    pages = "38--48",
    year = "2015"
}
To create such a bib out of OrcIDs there is a useful application. The bib data is a standard that can be used often. However, we want to go further and create a website. Luckily, Pybtex already has a system to write HTML files based on a BibliographyData object. First, a Style is created to format the data and then a Backend is used to write the data in the right format. We can use the existing HTML backend. For it, we can use the standard “unsrt” bibliography style:
from pybtex.style.formatting.unsrt import Style
from pybtex.backends.html import Backend
if __name__ == "__main__":
db = DB()
orcs = [OrcID(*t) for t in db.getList()]
db.close()
alldocs = []
api = API()
for orc in orcs:
alldocs += [d for d in api.getWorks(orc) if orc.start <= d.date <= orc.stop]
alldocs.sort()
uniqdocs = [doc for doc,_ in itertools.groupby(alldocs)]
bib = BibliographyData()
for d in uniqdocs:
joinBibliography (bib,parse_string(api.getWork(d),"bibtex"))
style = Style()
formatbib = style.format_bibliography(bib)
back = Backend()
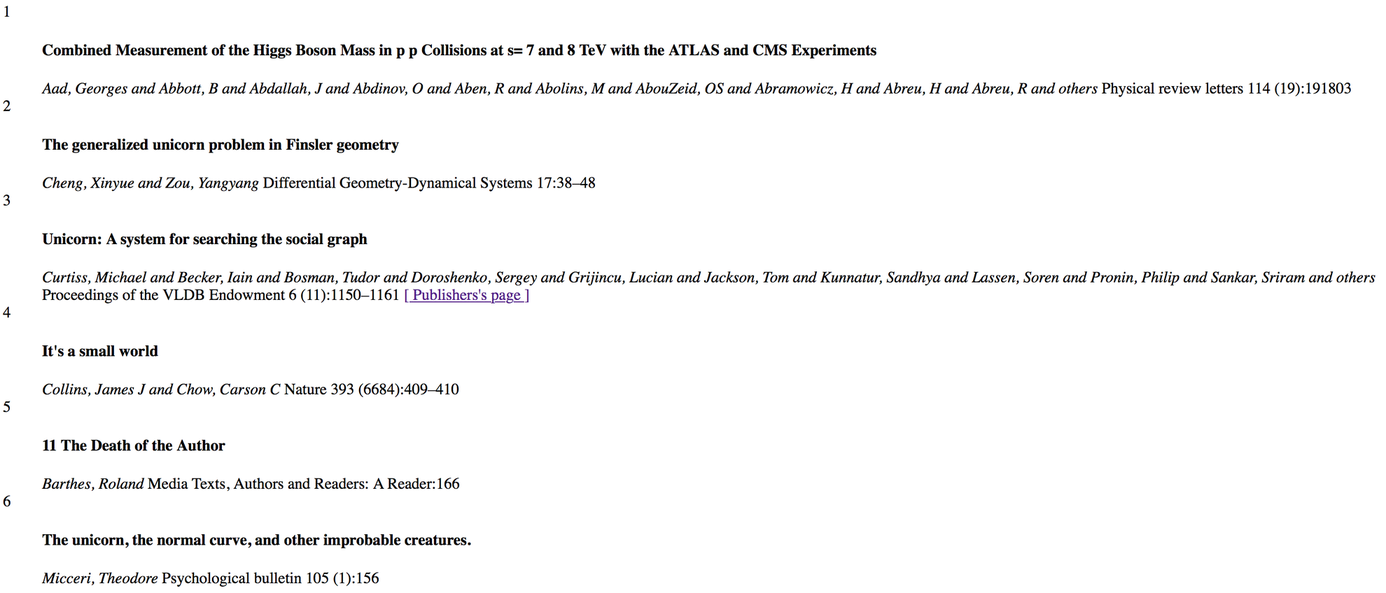
back.write_to_file(formatbib,"out.html")Line 1 loads the unsrt Style and line 2 the html Backend. In line 16, the Style object is created and in line 17, it’s used to create a formatted bibliography. Line 18 creates the Backend object and in line 19, it is used to write the formatted bibliography in a file called “out.html”. You can dowload the resulting htm site here.

Since this does not look pretty, we start to tweak the result. First, we look in the Style. The idee of the style is that for every entry a Rich text object is created. Those objects then are rendered from the backend. The Rich text has six classes:
- Text
- String
- Tag
- HRef
- Protected
- Symbol
The Symbol is the smallest atom that represents one special symbol, like a line break. A String class is an other atom of the Rich text classes, the last atom is Protected, which is not affected by case-changing operations. The other classes are containers with all Rich text classes. A HRef creates a link. Tag has a name and creates a tag with it. Text is a container with no special feature. These allow classes to define the look of an entry. However, one thing is missing for our HTML rendering. HTML-Tags can have options like special CSS classes or direct CSS commands. To solve this, we create our one HtmlTag that is inherited form the normal Tag:
class HtmlTag(Tag):
	def __init__(self, name, opt, *args):
		super(HtmlTag,self).__init__(name, *args)
		self.options = opt
	def render(self, backend):
		text = super(Tag, self).render(backend)
		try:
			return backend.format_tag(self.name, text, self.options)
		except TypeError:
			return backend.format_tag(self.name, text)
In line 1, the new class is defined with the super class Tag. Line 2 starts the initialization. It gets a name and *args like a normal Tag as input but also gets a opt argument for the options. In line 3, the initialization of Tag with name and *args is called using the super function. Afterwards, the extra opt argument is saved in self.options (line 4).
Every Rich text object has a render function that is called with the backend to render the right representation. We need to overwrite these to get the options to the backend after line 5. In line 6, the super function is used to render the text. This is necessary because a Tag is a container, so all sub Rich texts must be rendered first. The rendering can be send to the backend and the result is returned in line 8. Like a normal tag, it gets a name and the text as input, but also gives the options as input.
However, not every backend supports a rendering. It’s possible that these function create a TypeError because they expect that format_tag have only two arguments. This shouldn’t break the rendering. So the Exception handling is used to switch back to the normal Tag rendering in such cases. The statement is placed in a try block in line 7. After this, a except block is created that catches the TypeError (line 9) and returns the rendering without the options (line 10).
With this HtmlTag we can create our own style with a prettier output. The Styles has many functions like:
- format_article
- format_book
- format_inbook
- format_inproceedings
The different functions are called for different types of bibtex entries. We only use the format_article function. All entries in our example are article. However, the other types should not break the complete process, so we again inherit from an existing style. We use the unsrt Style as super class:
<div>
<h4>*title*</h4>
<i>*authors*</i><br>
*journal*<br>
<a href="https://doi.org/*doi*">[ Publishers's page ]</a>
</div>
To get this result the class looks like this:
class HtmlStyle(Style):
	def format_article(self, context):
		ret = Text()
		ret += HtmlTag("h4","style=\"margin-bottom: 2px;\"", context.rich_fields['title'])
		ret += Tag("i",context.rich_fields['author']) + Symbol('newblock')
		ret += context.rich_fields['journal']
		if 'volume' in context.fields:
			ret += Symbol("nbsp") + context.rich_fields['volume']
		if 'number' in context.fields:
			ret += Symbol("nbsp") + "(" + context.rich_fields['number'] + ")"
		if 'pages' in context.fields:
			ret = ret + ":" + context.rich_fields['pages']
		if 'doi' in context.fields:
			ret += Symbol('newblock') + HRef('https://doi.org/' + context.fields['doi'],"[ Publishers's page ]")
		return HtmlTag("div","class=\"" + context.fields['year'] +  " mix \"",ret)
The format_article function gets the input context. This context has the same information like the corresponding entry in the variable fields (for example line 7). However, the same information is also given as Rich text in the variable rich_fields (for example line 4). In cases where strings are needed, the fields variable is used. Where Rich text is needed we use the rich_fields variable.
Line 3 initializes the return container as empty Text(). After this, new content is added to the end of this container. In line 4, the title line is added to the content as h4. The HtmlTag is used directly. The HtmlTag has the options style, that change the margin to the bottom. The authors are added in line 5. Here, the authors are warpped into a i-tag befor they are added. Afterwards, a newblock Symbol is added which stands for a linebreak.
Line 6 adds the journal title as Text. After this, optional journal information is given (volume, number and pages). If they exist, they should be added to Text. In line 8, the volume is added. In front of it another Symbol is placed. The nbsp Symbol stands for a non-breaking space. In line 10, the number is added. Here, “(“ and “)” are added as normal Strings. They are automatically converted from the Text by the adding operation in a Rich-String.
Line 12 adds the pages. Here, not “ret +=” is used, but “ret = ret +”. On the first glimpse, they look equivalent but the evaluation order different. In the second case, first, the ret + “:” is evaluated. That means that the add functions of the Rich text is evaluaeted first. Alternatively, the “:” + context.rich_fields[‘pages’] is evaluated first which triggers the add function of the standard String and creates an error. In line 14, the doi is added as HRef where the link is given as standard String. In the last line, the enclosing div is created as HtmlTag. Here, the options are classes: the year as number and “mix”. The later is used later in the tutorial.
Our new main looks as follows:
if __name__ == "__main__":
	db = DB()
	orcs = [OrcID(*t) for t in db.getList()]
	db.close()
	alldocs = []
	api = API()
	for orc in orcs:
		alldocs += [d for d in api.getWorks(orc) if orc.start <= d.date <= orc.stop]
	alldocs.sort()
	uniqdocs = [doc for doc,_ in itertools.groupby(alldocs)]
	bib = BibliographyData()
	for d in uniqdocs:
		joinBibliography (bib,parse_string(api.getWork(d),"bibtex"))
	style = HtmlStyle()
	style.sort = lambda x: sorted(x, key = lambda e:-int(e.fields['year']))
	formatbib = style.format_bibliography(bib)
	back = Backend()
	back.write_to_file(formatbib,"out.html")
The only difference to the previous main function are in line 14 and 15. In line 14, the new HtmlStyle is used instead of Style. In line 15, then the sort function is overwritten that sort all entries before they are rendered. The entries are sorted after the negative int value of the year member. Such that the sort order is reversed
The result can be downloaded here and looks now much prettier:
However, some parts do not fit to our expectation: the line breaks, the formatting of the title and the numbers in every entry. All three things have different sources in the Backend. So we can get rid of these by implementing our own HtmlBackend. Of course we only want change the things that are not in our favor, so the class will inherit form the normal html Backend. Three things that we must change are:
- The interpretation of Symbols
- The use of the HtmlTag
- How an entry is written
- The enclosing html
The last one is not necessary but make things simpler at the end. The result class looks as follows:
class HtmlBackend(Backend):
symbols = {'ndash': u'–', 'newblock': u'<br/>\n', 'nbsp': u' '}
format_tag = lambda self, tag, text, options =None: u'<{0} {2} >{1}</{0}>'.format(tag, text, options if options else "") if text else u''
label = None
def write_entry(self, key, label, text):
if label != self.label:
self.output(u'<h3 class=\"{0} year\">{0}</h3>\n'.format(label))
self.label = label
self.output(u'%s\n' % text)
write_epilogue = lambda self: self.output(u'</div></body></html>\n')
prologue = u"""<!DOCTYPE html PUBLIC "-//W3C//DTD HTML 4.01//EN">
<html>
<head><meta name="generator" content="Pybtex">
<meta http-equiv="Content-Type" content="text/html; charset=%s">
<title>Bibliography</title>
{HEAD}
</head>
<body>
{BODY}
<div id="content">
"""
def prepout (self, head, body):
self.prologue = self.prologue.format(HEAD = head, BODY = body)
def write_prologue(self):
try:
self.prepout("","")
except ValueError:
pass
self.output(self.prologue % (self.encoding or pybtex.io.get_default_encoding()))In line 2, a class variable symbols is set. The used dict has for every Symbol a entry that assign the corresponding rendering to it. The newblock entry is assigned to <br/> so that the line breaks work. The next feature is that the HtmlTag really work. The normal Backend does not render the options field. This is done in line 3 where the format_tag function is overwritten with an optional argument options. If it is not given, it places an empty string as options by string formatting and conditional expression.
In line 4 to 9 the write_entry is overwritten. Thise is the function that is called for every entry. Here we can get rid of the numbers that are rendered before the entries. The function gets as arguments: a citation key, a label and a text. A citation key is not used from us anywhere. The label is the number that is given. However, we will change this in the main function so that this is the year of the entry. The last argument is then the entry as rendered text. We want that every time a new year is reached this year is printed as <h3>. So we must save in self what the last year was. This is done in self.label. In line 4, this is set to None because no year was rendered until now.
In line 6, it is checked if a new label (year) is reached with this entry. If this is the case, a <h3> is output in line 7 and these label is saved as the last output label in line 8. Note that here the function self.output is used to create the output. This is a function of the Backend that writes the output to the file. In line 9, the rendered text is written with self.output.
The last feature is the enclosing html. Here, two functions are interesting: write_prologue and write_epilogue. Like the names suggest write_prologue is called before the entries are written and write_epilogue is called after the entries are written. The later, in line 10, is strait forward: Close the enclosing div, the body and the complete html. It is a simple lambda function. The more complex case is the write_prologue function because the complete head of the html file are written here. In line 11-21, the prologue is prepared as class variable. This is done as a Triple quoted string. In that way, the string goes over multiple lines.
The string is then in the write_prologue function (line 24-29) rendered with self.output. In the prepared string is a “%s” (line 14) that is replaced in line 29 with the right encoding of the html file. The string also contains a “{HEAD}” and a “{BODY}”. These are place holder of extra head and body content that can be added. For them a simple prepout function is given at line 22-23. However, if these function is not called they are replaced with empty strings. To ensure this, the function is called in write_prologue with empty strings (line 26). If the prepout function is called before it produce an error because “{HEAD}” and “{BODY}” no longer exists in the string. So a try (line 25-26) and a except block (line 27-28) are used to catch this ValueError and do nothing.
The main function only need a small change:
if __name__ == "__main__":
db = DB()
orcs = [OrcID(*t) for t in db.getList()]
db.close()
alldocs = []
api = API()
for orc in orcs:
alldocs += [d for d in api.getWorks(orc) if orc.start <= d.date <= orc.stop]
alldocs.sort()
uniqdocs = [doc for doc,_ in itertools.groupby(alldocs)]
bib = BibliographyData()
for d in uniqdocs:
joinBibliography (bib,parse_string(api.getWork(d),"bibtex"))
style = HtmlStyle()
style.sort = lambda x: sorted(x, key = lambda e:-int(e.fields['year']))
style.format_labels = lambda x: [int(e.fields['year']) for e in x]
formatbib = style.format_bibliography(bib)
back = HtmlBackend()
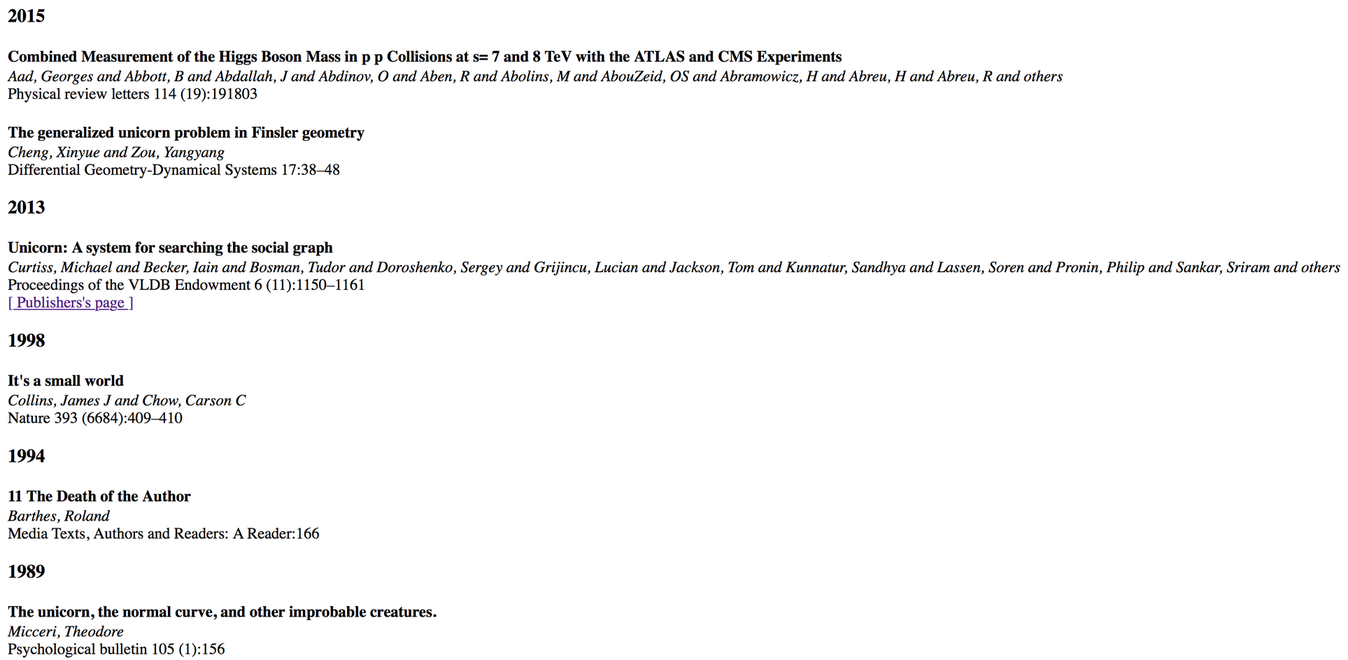
back.write_to_file(formatbib,"out.html")In line 17, now the HtmlBackend and not Backend is used. The rest is the same. The result can be downloaded here and looks as follows:
Filter HTML Content with Javascript
The filtering with javascript is possible but a pain without any framework. So we use here a framework: The jQuery framework provides functions that are much easier to use. For the tutorial, jQuery version 3.2.1 is used. You need to download the .js file and put them beside your out.html. You need the jquery-3.2.1.min.js file. When you downloaded the files we can start and change the content of our html file to work with them. For this we can use the extra body and head that we have created in our HtmlBackend. So we start by creating a simple head that imports the javascript file:
head = """
<script src="jquery-3.2.1.min.js"></script>
<script type="text/javascript">
//empty
</script>
"""
There is also an empty inline javascript block that is field later. We also create a simple body that creates a search input field that we then can use to filter the data:
body = """
<div class="cd-filter-content">
	<input type="search" placeholder="Try unicorn">
</div>
"""
We can now add a line to the main function to add them to the out.html:
if __name__ == "__main__":
	db = DB()
	orcs = [OrcID(*t) for t in db.getList()]
	db.close()
	alldocs = []
	api = API()
	for orc in orcs:
		alldocs += [d for d in api.getWorks(orc) if orc.start <= d.date <= orc.stop]
	alldocs.sort()
	uniqdocs = [doc for doc,_ in itertools.groupby(alldocs)]
	bib = BibliographyData()
	for d in uniqdocs:
		joinBibliography (bib,parse_string(api.getWork(d),"bibtex"))
	style = HtmlStyle()
	style.sort = lambda x: sorted(x, key = lambda e:-int(e.fields['year']))
	style.format_labels =  lambda x: [int(e.fields['year']) for e in x]
	formatbib = style.format_bibliography(bib)
	back = HtmlBackend()
	back.prepout(head, body)
	back.write_to_file(formatbib,"out.html")
Line 19 is added and add the head and body to the file. The result looks the same with the difference that there is now a function less search input on the top. It can be downloaded here. To add functionality to the search input, javascript needs to be written. All javascript code that is written is added to the head string in the inline javascript block. So everything that you see here must be insert there to check the functionality by yourself.
The first step binds an event to the input field. JavaScript knows different events. Here, we want to use the keyup event. That means, every time a key is pressed and released, these event is called. To bind these event, we use the jQuery function keyup(). It gets as input an handler, i.e. a function that is called when the event is triggered. Here, we use an anonymous function that simple create an alert with the content of the search input. However, to make sure that the binding works, we must wait until the html is completely loaded and then bind the event. This can be done by the jQuery function ready(). We use the simplified form: $(function(){…}). Here is the complete javascript:
$(function(){
	search = $(".filter-input input[type='search']")
	search.keyup(function(){
		inputText = search.val().toLowerCase()
		alert(inputText)
	})
})
In line 2, we create a jQuery object called search that contain the input field. To identify these field. we search for an object of class “filter-input” and that is an input html tag of type “search”. These is only true for our search input field so that we have an exact description of it. In line 3, the keyup event is bound. In line 4, the content is loaded from search and saved in inputText. The content is the value of the input and can be retrieved with the jQuery function val(). The resulting string is then transformed to lower case with a standard JavaSrcipt String function toLowerCase(). In line 5; this inputText is used to create an alert. The result can be downloaded here.
The functionality is not very useful. We do not want to create alert, we want to filter the content with the input. We add these functionality in the following:
$(function(){
	search = $(".filter-input input[type='search']")
	search.keyup(function(){
		inputText = search.val().toLowerCase()
		$('.mix').each(function() {
			if($(this).text().toLowerCase().match(inputText) ) {
				$(this).show()
			}
			else {
				$(this).hide()
			}
		});
	})
})
In line 5, the jQuery each function is called that, for every element with the class “mix”, calls a anonymous function. In these function, the element, for that it is called, is saved in the variable this. So there function check in line 6, if the text have a match with the inputText. The jQuery function text() returns the combined text content of the element which contains: the title, the authors, and the journal. To make sure that the case of the characters do not matter these string is also changed toLowerCase. If they match, this element is marked as shown (line 7) with the jQuery function show(). If these is not the case, this element should be hidden. This is done in line 10 with the jQuery function hide. The result can be downloaded here.
We have a working filter that hide entries that not contain the search input. However, that only applies for the bibliography entries. The years that are between them are not filtered. So that when the corresponding entries are hidden, they are displayed with no content under them. We want also to hide these years. This can be done with a simple jQuery each call in the right time:
$(function(){
	search = $(".filter-input input[type='search']")
	search.keyup(function(){
		inputText = search.val().toLowerCase()
		$('.mix').each(function() {
			if($(this).text().toLowerCase().match(inputText) ) {
				$(this).show()
			}
			else {
				$(this).hide()
			}
		});
		$('.year').each(function() {
			if ($("."+$(this).text()+ ".mix").is(":visible")) $(this).show()
			else $(this).hide()
		});
	})
})
The new javascript is in line 13-16 directly after the each function for the entries is finished. It again uses the jQuery function each to apply a function to every year element (line 13). These elements can be identified with the class “year”. The function use the jQuery function is to check if any of the entries with this year is “:visible” (line 14). The entries with this year can be found because they have the year as class and also the class mix. If there is any entire left, then the year is shown (line 14), otherwise it is hidden (line 15). The result can be downloaded here.
Conclusion
If you have done the complete tutorial, you have seen and used some interested python syntax that helps you with you own developments. Maybe you are only here because you are interested in the ORCID-API. If this is the case, you have seen some basic functions and many links to read further. However, you also have an idea how to interact with it in python. That gives you an advance, if you want to write you own project also in python. If you have any further questions, just send them to: Fabian Gärtner
However, the result is a functional application that used ORCID as a base. Of course, this means that your researcher needs to keep their ORCID page updated. However, this should not be a problem, since ORCID is getting more and more famous and used. For example, many publishers already need you to give a ORCID to publish with them. The system has some open problems though:
- How to insert new authors?
- What to do with authors that are now active in your group and so have no end date?
- What to do with paper that are not in bibtex format?
- What to do with paper that miss data?
- The title could be a little different in the same paper?
- The information of the same paper may be different from different source ORCIDs.
- The filtering by the year would be nice.
- etc.
If you interested in using this productively, look at the GitHub repository. If you would like to support this project with your ideas, you can do so here: ORC-Schlange on Github
Did you find this tutorial on how to use ORCID for a Static Publication Site? On the ScaDS.AI Dresden/Leipzig blog, you can find many more interesting and helpful tutorials!


funded by:

ScaDS.AI Dresden/Leipzig (Center for Scalable Data Analytics and Artificial Intelligence) is a center for Data Science, Artificial Intelligence and Big Data with locations in Dresden and Leipzig.
Dresden
Visitor address
Technische Universität Dresden
ScaDS.AI Dresden/Leipzig
Bürogebäude Strehlener Straße
Strehlener Straße 12, 14
01069 Dresden
ScaDS.AI Dresden/Leipzig
Bürogebäude Strehlener Straße
Strehlener Straße 12, 14
01069 Dresden
Postal address
Technische Universität Dresden
Zentrum für Informationsdienste und Hochleistungsrechnen
ScaDS.AI Dresden/Leipzig
01062 Dresden
Zentrum für Informationsdienste und Hochleistungsrechnen
ScaDS.AI Dresden/Leipzig
01062 Dresden
Leipzig
Visitor address
ScaDS.AI Dresden/Leipzig
Löhrs Carré
Humboldtstraße 25,
3. Obergeschoss
04105 Leipzig
Löhrs Carré
Humboldtstraße 25,
3. Obergeschoss
04105 Leipzig
Postal address
Universität Leipzig
Data Science Zentrum
Internes Postfach: 212104
04081 Leipzig
Data Science Zentrum
Internes Postfach: 212104
04081 Leipzig
Quicklinks:
Copyright 2025 © SCADS.AI Dresden/Leipzig – All rights reserved.